Personalised Christmas Cards 2017

Saturday 26 May 2018

Clean And Simple Cake Die Cut Card


Hello friends, followers and passers by, I have been making a quick and easy 
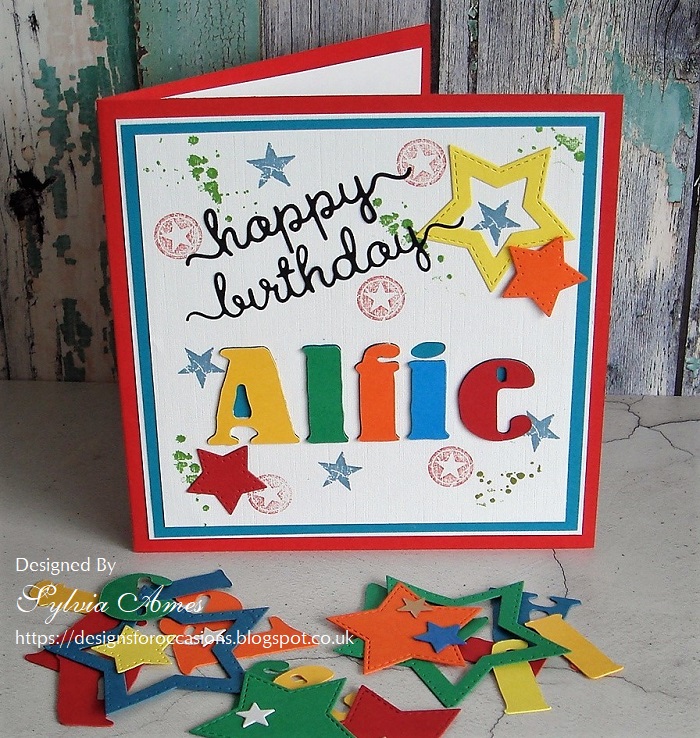
card today using a stamp and cut set from Hero Arts.  I bought this some time ago and thought it was time to make something with it.


Materials I used:

papermilldirect white linen card 255gsm
Hero Arts Stamp and Cut set "Birthday"
Liquid pearls, sequins and glitter 
Corner rounder punch

Firstly I made a card blank by folding a piece of A5 white linen card in half and rounding the top corner.  The cake and candle were stamped onto a scrap of white linen card and each layer of the cake stamped with the corresponding patterned stamp and then die cut.


The "happy birthday" sentiment was stamped directly onto the card blank three times down the left hand side of the card and the "to you" sentiment was stamped underneath.  The cake stand was stamped at the side of the sentiment and one of the pattern stamps was used to decorate the card.  The cut out cake was placed on top of the cake stand using 3D sticky pads and the cake and card were decorated with liquid pearls, sequins and glitter.

Sylv xx

Friday 18 May 2018

Embossing folder letterpress technique - Blue Butterfly Birthday Card


Today I have a blue butterfly birthday card and a tutorial over on the papermilldirect blog showing how to create a background using the embossing folder letterpress technique.


I found three inchies in my bits box and thought I would use them on a birthday card.  The inchies were attached to a piece of stamped and sewn brown paper.  I embossed a square of card using the letterpress technique for the background and highlighted a few of the embossed butterflies with glitter for a little bit of sparkle.


To make the card I trimmed the edges of the embossed and coloured panel to size, coloured  the inchie panels and a die cut butterfly with distress markers and sewed them onto scraps of printed and brown paper. The inchies embellishment and butterfly were attached to the embossed background, this was then attached to a square of buff card to compliment the craft paper inchie panel then onto a white card blank.  A computer generated sentiment was added under the large butterfly  and glitter added to some of the embossed raised butterflies. 

Sylv xx

Sunday 13 May 2018

Messy Crafting with inks and stamps


Hello everyone, I have lots of birthday cards to make but am finding it difficult to get inspiration at the moment.  To help get my mojo back I have been a playing with some arty inkiness recently, the Gothic Arch was for the UK Stampers Forum monthly challenge and the panel was inspired by a project in Craft Stamper using an old tin can.   


I had some corrugated card I saved to up cycle and used it in my first project.  The corrugated card was washed with gesso and small areas were covered in texture paste to fill in some of the channels.  The card was sprayed with inks, left to dry well before adding a stamped panel of tissue paper using Glue n Seal.  When the glue was dry I blending distress inks onto the panel and round the edges to add more colour.  Chit Chat sayings were added and a cog and arrow added.  I mounted the panel onto a piece of papermilldirect black card.


The Gothic Arch was cut from papermilldirect cream vellum card, a lovely weight for this project.  I stamped and clear embossed the Big Ben stamp, blended blue, purple and green distressed inks onto the arch and flicked it with water.  A few background stamps were stamped and a few stencilled areas added,  The wings were cut from a larger stamp, coloured  and added with 3D sticky pads and a stamped sentiment added underneath with 3D sticky pads.

Still struggling with ideas for my female cards this year, off now to the craft room to have a go!

Sylv xx

Wednesday 9 May 2018

Bright Personalised Birthday Card


Hello friends, followers and anyone passing through.  Today I have a colourful birthday card made for an eleven year old boy. 


The name was cut out using  the Silhouette, it was typed in Bernstein SF font and enlarged to 166pt then cut  out five times using papermilldirect Daffodil Yellow Smooth Card, Billiard Green Plain Card, Mandarin Orange Plain Card, Deep Blue Plain Card, Christmas Red Plain Card and White Linen card.   The words were cut from a square of white card which was trimmed down ready for stamping and adding the sentiment, the rest of the letters were cut using scraps of coloured card.  A blue and a white square each slightly larger than the cut out white square were cut ready for layering up the card onto a Christmas Red Card Blank.


Stars and splats were stamped onto the front white card, a few cut out stars and a die cut sentiment were added before layering it up onto the red card blank.  I then added the colourful letters using 3D sticky pads.  A White Plain Paper insert was added with a greeting and a yellow cut out number eleven.

Sylv xx 

Thursday 3 May 2018

One For The Boys


Hello friends and followers.  This week I have been playing with an orange, brown and buff colour palette for a male birthday card.  I find this colour palette with the die cut star and circle background stamping works well.


I blended distress inks in yellows and oranges onto an oblong of  smooth white card and stamped a background pattern onto it in dark brown ink.  This was mounted onto an oblong of brown card then onto a buff A6 card blank.

A medium sized star was die cut, stamped with part of the background stamp in brown ink and edged with orange distress inks.  The star was attached to the card with a swirl of thin cord behind.  A computer generated sentiment strip was added under the star.


Materials used:
Below is the same design in a blue and green colour palette with an embossed star and die cut sentiment on a navy card blank.


Sylv xx