Personalised Christmas Cards 2017

Sunday, 30 September 2018

Adding A Flourish To A Butterfly Card


Good morning friends, followers and passers by.  Today I have my design team card for the Daring Cardmakers Challenge.   Our host this week is Kathy, she wants to see a flourish on your card creations.  Pop over to Daring Cardmakers where you will find  the design team inspirational cards and the link to add your cards to the challenge.


My card has a texture paste flourish background and a butterfly stamped using my newest AALL and Create butterfly stamp.

I used blue papermilldirect pearlised card, a Tim Holtz flourish stencil and texture paste.  This was mounted onto papermilldirect black card then onto a white card blank.  the butterfly was stamped onto the card and a fussy cut butterfly coloured with distress markers was added over it.  A computer generated sentiment was added to finish the card.

Do pop over and add your flourish cards to the challenge, we love to see what you lovely ladies come up with.

Sylv xx

Friday, 28 September 2018

2019 Create-A-Calendar - Autumn Months And December


Hello friends, followers and passers by, today I have the last four pages of my 2019 papermilldirect Create-A-Calendar.  It is now ready to hang up when the new year arrives.

So here they are, more details can be found on my papermilldirect design team post.


My September page is the beginning of Autumn.  Yellow, green, orange, red and golds oak leaves and the Green Man from Lavinia Stamps.


October had to be something Halloween related.  Black, purple and red with a spooky Stampers Anonymous raven stamp and tiny die cut bats.


November was a difficult one.  Orange, yellow and green, firework flourishes and some inspirational words from Visible Image.


Lastly my December page.  It had to be red with white snow falling, an image of Father Christmas and pretty snowflakes. 

Hope you hve enjoyed seeing my calendar come together.

Sylv xx


Tuesday, 25 September 2018

Foiling Machines - A Review Of Go Press And Foil Machine


Have you a foiling machine but not got to grips with it yet?  Today I have a post over on the papermilldirect blog reviewing the Go Press And Foil machine and which papermilldirect card works best with it.

I have a few samples to show you of my recent makes using the foiling machine.  The things I gather together before foiling are - dies, foils, card, sharp scissors, a rough sponge for buffing away loose foil, a rubber for removing any foil residue and the three 300gsm card shims I use with my Sizzix Bigshot.


I find papermilldirect card ideal for foiling, even the textured cards worked well for me for sentiments but you sometimes get a sketchy look on textured card if the die has a large area of foiling. 

For my card samples I used a selection of papermilldirect card, black plain 250gsm, navy plain 240gsm, buff smooth 260gsm, Christmas red plain 240gsm, teal plain 240gsm, marine blue smooth 240gsm, white linen 255gsm, white hemp 255gsm and white hop sack 255gsm


Above is a 15cm square Christmas card, the snowflake was foiled with holographic foil onto a square of white linen card and layered onto navy card then onto the white linen card blank. 


The buff card above, which is 10.5cm square, was foiled with three different foils, a great way to use up left over bits of foil. 


Above is a picture of a foiled piece, a letterpress piece and a piece using the used foil image.  I do like the letterpressing for making small thank you cards and this seahorse is a really detailed foil stamp. 

If you are struggling with your foiling machine don't give up,  check out how to videos and keep trying.  Like all new machines it is just practise and eventually using them comes as second nature.

Sylv xx

Sunday, 23 September 2018

Turn Up The Beads At The Daring Cardmakers Challenge


Hello everyone, today I have my DT card for this week's Daring Cardmakers Challenge.  Mirri is hosting the challenge this week and she wants to see Bead(s) in your creations.

Beads are something I have not used for some years, I used to make cards with wire and bead embellishments and thought I would make something similar for this challenge.  Unfortunately my stash of wire had tarnished so that idea was out. I only had a small amount of stash with me this week so that caused problems too.

I re-thought and decided to add some beads to hessian cord to this stencilled card.  The photo proved difficult with the weather but you can see the blue and green beads I picked to match the stencilled colours.


I recently bought some Clarity Stamp stencils and used one of these with distress oxide inks to make the background, two papermilldirect white linen card squares were cut out and a die cut circle cut from each. A sentiment was stamped onto the front card before the apertures were layered over the stencilling.  A piece of lime green plain card 290gsm was matted onto a white linen card blank, the cord was fastened round the white squares and layered onto the green card using 3D sticky tape. 


I added some beads to the snowflake on this Christmas card too, it was foiled using the Go Press and Foil machine and will be one of my Christmas card designs this year when I decide whether to add a sentiment or not.

Do dig out those beads and pop over and join us for the Daring Cardmakers Challenge this week.

Sylv xx

Saturday, 22 September 2018

2019 Create-A-Calendar Summer Months


Hi everyone,  today I have another three pages from my 2019 papermilldirect Creat-a-Calendar covering the Summer season, June, July and August to show you.  I am having so much fun with these using Oak House Studio spray inks which I have not used for some time.


For June I used blue and green spray inks and a very old stamp by Aspect of Design "Butterfly Beauties".  The  paper butterflies were coloured with distress ink and stamped with a script stamp then added over the stamped butterflies in the girl's hair.


More blue spray ink with some purple stencilling on July's page, the face is from Stampers Anonymous "Daydream" stamp set.  The flowers were stencilled with distress ink and paper flowers and butterflies were added to soften the edge of the image.


Back to blue and green spray inks and yellow distress ink stencilling for August.  Marianne Designs "Romantic Vintage CS0867" with Prima Marketing Finnabair "Butterfly 2" were used as the main image and AALL and Create "Set #43" stamps were, stamped with distress inks and black Archival ink around the image.

I have been thinking about what to do with my old calendars and the artwork created for each month, do I keep them intact or use the artwork for other things?  I so loved what I created for last year's calendar and thought I would cut out the images and put them into a journal, mount them in frames or use them in my cardmaking.


I made these two cards from the January and February 2017 pages, mounting the inked panels onto coloured card, papermilldirect teal smooth 240gsm and new lilac smooth 240gsm then onto a cream vellum plain 290gsm card blank and a white hemp 255gsm card blank.  I added a congratulations sentiment to February to send as an anniversary card.

The scrap card from the calendars will be saved for stamping, inking and stencilling later, and the coloured cover will be used too, a great way of upcycling rather than throwing the calendar away once the year is over.

Just another four months to complete in this year's calendar, hope you are all enjoying working on yours, the ones I have seen on facebook and Instagram are amazing. 

Just four more months to complete on my calendar, I hope to get these done today time permitting.

Sylv xx  

Sunday, 16 September 2018

One Layer Card Stamped And Coloured On Buff Card


Hello friend, followers and passers by, Today I have a one layer birthday card made with buff card and coloured with distress oxides and glitter.


Materials used:
  • Papermilldirect buff plain card 260gsm and white hemp 255gsm
  • stamps - AALL and Create set #43 and Crafty Individuals English Background Script
  • Archival ink - sepia
  • distress oxide inks
  • white embossing powder
  • fine glitter
  • white domes and sequins
I stamped the flower image onto a piece of buff card in sepia ink and also onto a scrap of paper to be cut out and used as a mask when stamping the script background.  I used distress oxides to colour the flowers and added white pen and glitter to the flower heads. placing the mask over the image again I lightly flicked watered down gesso over the panel using a small paint brush to give a speckled effect.  The sentiment was then stamped and white embossed.  Sequins and white domes were added to finish.


The finished panel was mounted onto a larger piece of white hemp card then matted onto a buff card blank.

I always like to send my cards with a matching envelope  check out the range of colours and fun patterns available in the papermilldirect shop.   Coloured envelopes can make your cards that little bit special or add fun if using one of the patterned range.

Sylv xx

Friday, 14 September 2018

Black And White Embossing On Kraft Card


Today I have my design team card for this week's Daring Cardmakers Challenge.  Ruth is hosting the challenge this week and wants to see embossing on your cards, that could be heat embossing or dry embossing or both the choice is yours.

I decided on black and white heat embossing for my card.  I have had the Altenew "Blooming Bouquet" set for some time and bought it with this style of card in mind.


Kraft card is among one of my favourite colours for card making and works really well with this style of  outline stamping.   The main flower image was stamped in black onto a card blank made from  papermilldirect buff card and embossed with clear embossing powder.


The center flower from the bouquet was stamped onto a scrap of buff card and embossed with white embossing powder, I cut this out and added it to the black stamped bouquet matching it up with the center flower.  The dots were stamped round the bouquet and white embossed.  

The sentiment was die cut three times and glued together to make a more substantial piece.  This was added to the card with sequins and dots of perfect pearls.

Check out the Daring Cardmakers challenge HERE .


Sylv xx


Friday, 7 September 2018

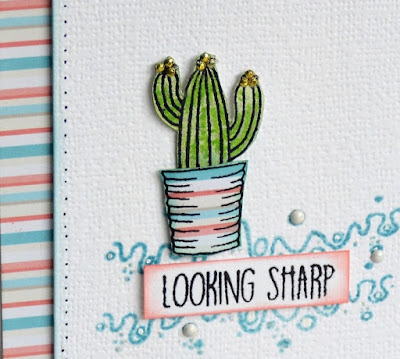
Looking Sharp With A Prickly Cacti


Today is the first challenge of the month over at Daring Cardmakers and  that means an elemental challenge.

This week's challenge is hosted by Shabneez and her elemental inspiration picture is below.   Which elements will you choose to make your card? Just pick three or more elements to use in your card, colour palette counts as one choice.


I chose stripes (from the lolly), wavy lines, flowering cacti, plant pot, block letters, blue, white and flamingo pink colours.


I added a strip of blue, pink and white striped paper to a papermilldirect white hemp card blank. I stamped two wavy seafoam lines onto an oblong piece of hemp card and attached this to the card blank with 3D sticky tape.  The cacti is from a stamp set bought recently, I chose the flowering cacti and squarish pot, the cacti was stamped onto white card, coloured and cut out   The pot was stamped onto the striped paper then cut out.


The block letter sentiment was stamped onto white card, cut to size and the edges coloured with distress ink.  The images and sentiment were attached with 3D sticky foam pads and the panel finished with tiny gold studs for the cacti flowers and white domes for the seafoam on the wavy lines.

There are some lovely elements to chose from in the picture, why not have a go and enter your card into this week's challenge.


More Papermilldirect Create-a-Calendar Pages


Hi everyone, have you bought your papermilldirtect 2019 calendar(s) yet.  I have a further three pages for you today, March, April and May.  I have added a circular frame round the inked and stamped circle on these three pages, I thought it framed the images nicely and will do this on all calendar pages.


The March page was sprayed with French mint and yellow  ink and stamped with an IndigoBlu stamp which came free with a magazine some years ago.  Love this stamp, the feel of the wind blowing through her hair is ideal for March.
 

I stencilled and stamped over the background, coloured the flowers and swirls on the stamp then added some white dots to the white areas.


The April page was sprayed with vintage blue and purple pray inks, and stamped with Marianne Designs "Romantic Vintage CS0869" and Inkilicious "Water Raindrops".


The background was stencilled using various stencils and distress oxides.  White pen was added to the raindrops.
 

May reflects the Japanese Cherry Blossom season (March/April and May).   White pearl,  pink, green and blue spray inks were splattered randomly and dabbed to keep the colour  less vivid.  The stamps used are quite old and I am not sure if they are still available, Non Sequrtur "Oriental Love letters" and LOTV oriental stamps.


The cherry blossom branches were coloured with distress oxides and white pen detail was added to the image. 

I am trying to complete three calendar pages at a time.  June, July and August will be my next three pages for the Summer season.

Back soon with the next three.

Sylv xx